Designing a client management tool that interfaces with an existing project management tool
2023
What was the problem?
BECI wanted to sell their in-house project management system, NSPEC, as a SaaS to other construction companies. They had the software to license, but they didn’t have any way to manage the people or companies that were going to use their service.
What was the solution?
I designed a tool that allows BECI to manage client profiles. Both company and user profiles can be added to the system, they can have their passwords reset by the administrator, and they can be activated or deactivated with the click of a button.

MY ROLE
Product Designer
THE TEAM
1 Product Designer
1 Product Owner
1 Project Manager
5 Developers
THE DELIVERABLES
Grayscale Wireframes
Hifi Prototypes
Screen Mocks
TOOLS USED
Figma
Google Suite
THE COMPANIES
Steele Consulting Inc: My employer where I worked as Product Design consultant.
BECI: BECI provides building envelope consulting services to over 2000 construction company clients, saving their clients millions of dollars. They are branching out into the SaaS market with NSPEC, their project management tool.
First wireframes
My first wireframes for this project were very basic. I worked closely with the developers at BECI, and my task was to make the process as simple as possible.
Each page, Tenants, Clients, and Employees, would have a simple grid. Users could be activated or deactivated, and each user’s information could be edited with an inline form. New users could be added by clicking the button at the top right of the grid.
At this point in the project, each page would have looked the same. The plan was for a lot of the functionality to be handled on the backend.
Adding a user, step one
To add a tenant, client, or employee, navigate to the correct page by clicking the item in the top navigation.

Adding a user, step two
Click the add user button at the top right of the grid to open an inline form. Fill in their information and click the save and invite button.

Adding a user, step three
By clicking the send invite button, an email will be sent to the user's email address so they can open NSPEC for the first time.

Second wireframes
For the second version of the wireframes, the development team told me that the managers wanted to see more of a flow. To accommodate this request, I removed the inline editing on the grids and made new pages for adding and editing information.
The Admin Dashboard
When a user logs in, they will see the admin dashboard. In order to change an NSPEC user’s permissions or edit their information, the admin still needs to navigate to the proper pages to do so.
There are a few additions to the dashboard in this second version. The first is the ability to change which tenant you’re viewing with the dropdown at the top left of the screen.
The second is the ability to add new clients and employees to the selected tenant from this screen. Clicking the invite buttons will take you through the adding a user flow and send them an invite to join NSPEC.
The third change is the addition of the admin grid. These admins are the people that will be using this system. They are the ones who invite new clients and employees to NSPEC. Admins cannot be added or edited from here, that can only be done on the backend, but BECI wanted the ability to change that in the future, so I added a button to add an admin, it’s just disabled for now.

New functionality for the tenants page
Similarly to the admins, the tenant’s information cannot be edited from the frontend. But like the admins, BECI wanted to be able to edit this information in the future, so I designed a page that will one day allow the information to be edited.
Also on the tenants page, users can invite new clients and employees to the selected tenant.


Inviting new users
Inline editing turned out to be confusing for the users, so I changed the flow a bit. Now, when adding a new user or editing an existing profile, all changes are made on a separate page, not within the grid itself.
Other than that, this process is largely the same as it was before. Sending an invite to a new profile will allow that person to access NSPEC.


Hifi designs
After getting approval from the BECI developers, I started working on a high fidelity prototype for the admin portal.
BECI’s style
Before I got started, the developers gave me this brand guide to follow while working on the UI.
However, I was given permission to stray from the brand guide a bit if I had a good reason. I opted to only use the Orbitron font for the large “Admin Portal” text in the top nav, and for the alert titles. I used PT Sans for the rest of the design mainly because Orbitron is a very wide font and it made the designs feel off balance in my opinion (also, I just don’t like Orbitron very much).
Thankfully, the stakeholders agreed with my font choice, and I was able to use PT Sans for most of the design.

Admin Dashboard
For the admin dashboard, only the UI was updated. The functionality remains the same.
The new collaborator page
During this phase of the design, the BECI team decided to change “clients” to “collaborators”. This decision was made because the word clients is used in NSPEC as the client of a collaborating company. So in my designs, the companies that use NSPEC are now collaborators, and their customers are now clients.

Collaborators and clients
While editing a collaborator’s page, I added a new section dedicated to the collaborator’s clients.
When a collaborator accesses NSPEC, they can create a list of their clients that they will track with NSPEC, and that list is added here for the admins to view.
Admins can add other clients from the NSPEC system to this list using the dropdown, and they can remove clients from the list as well.

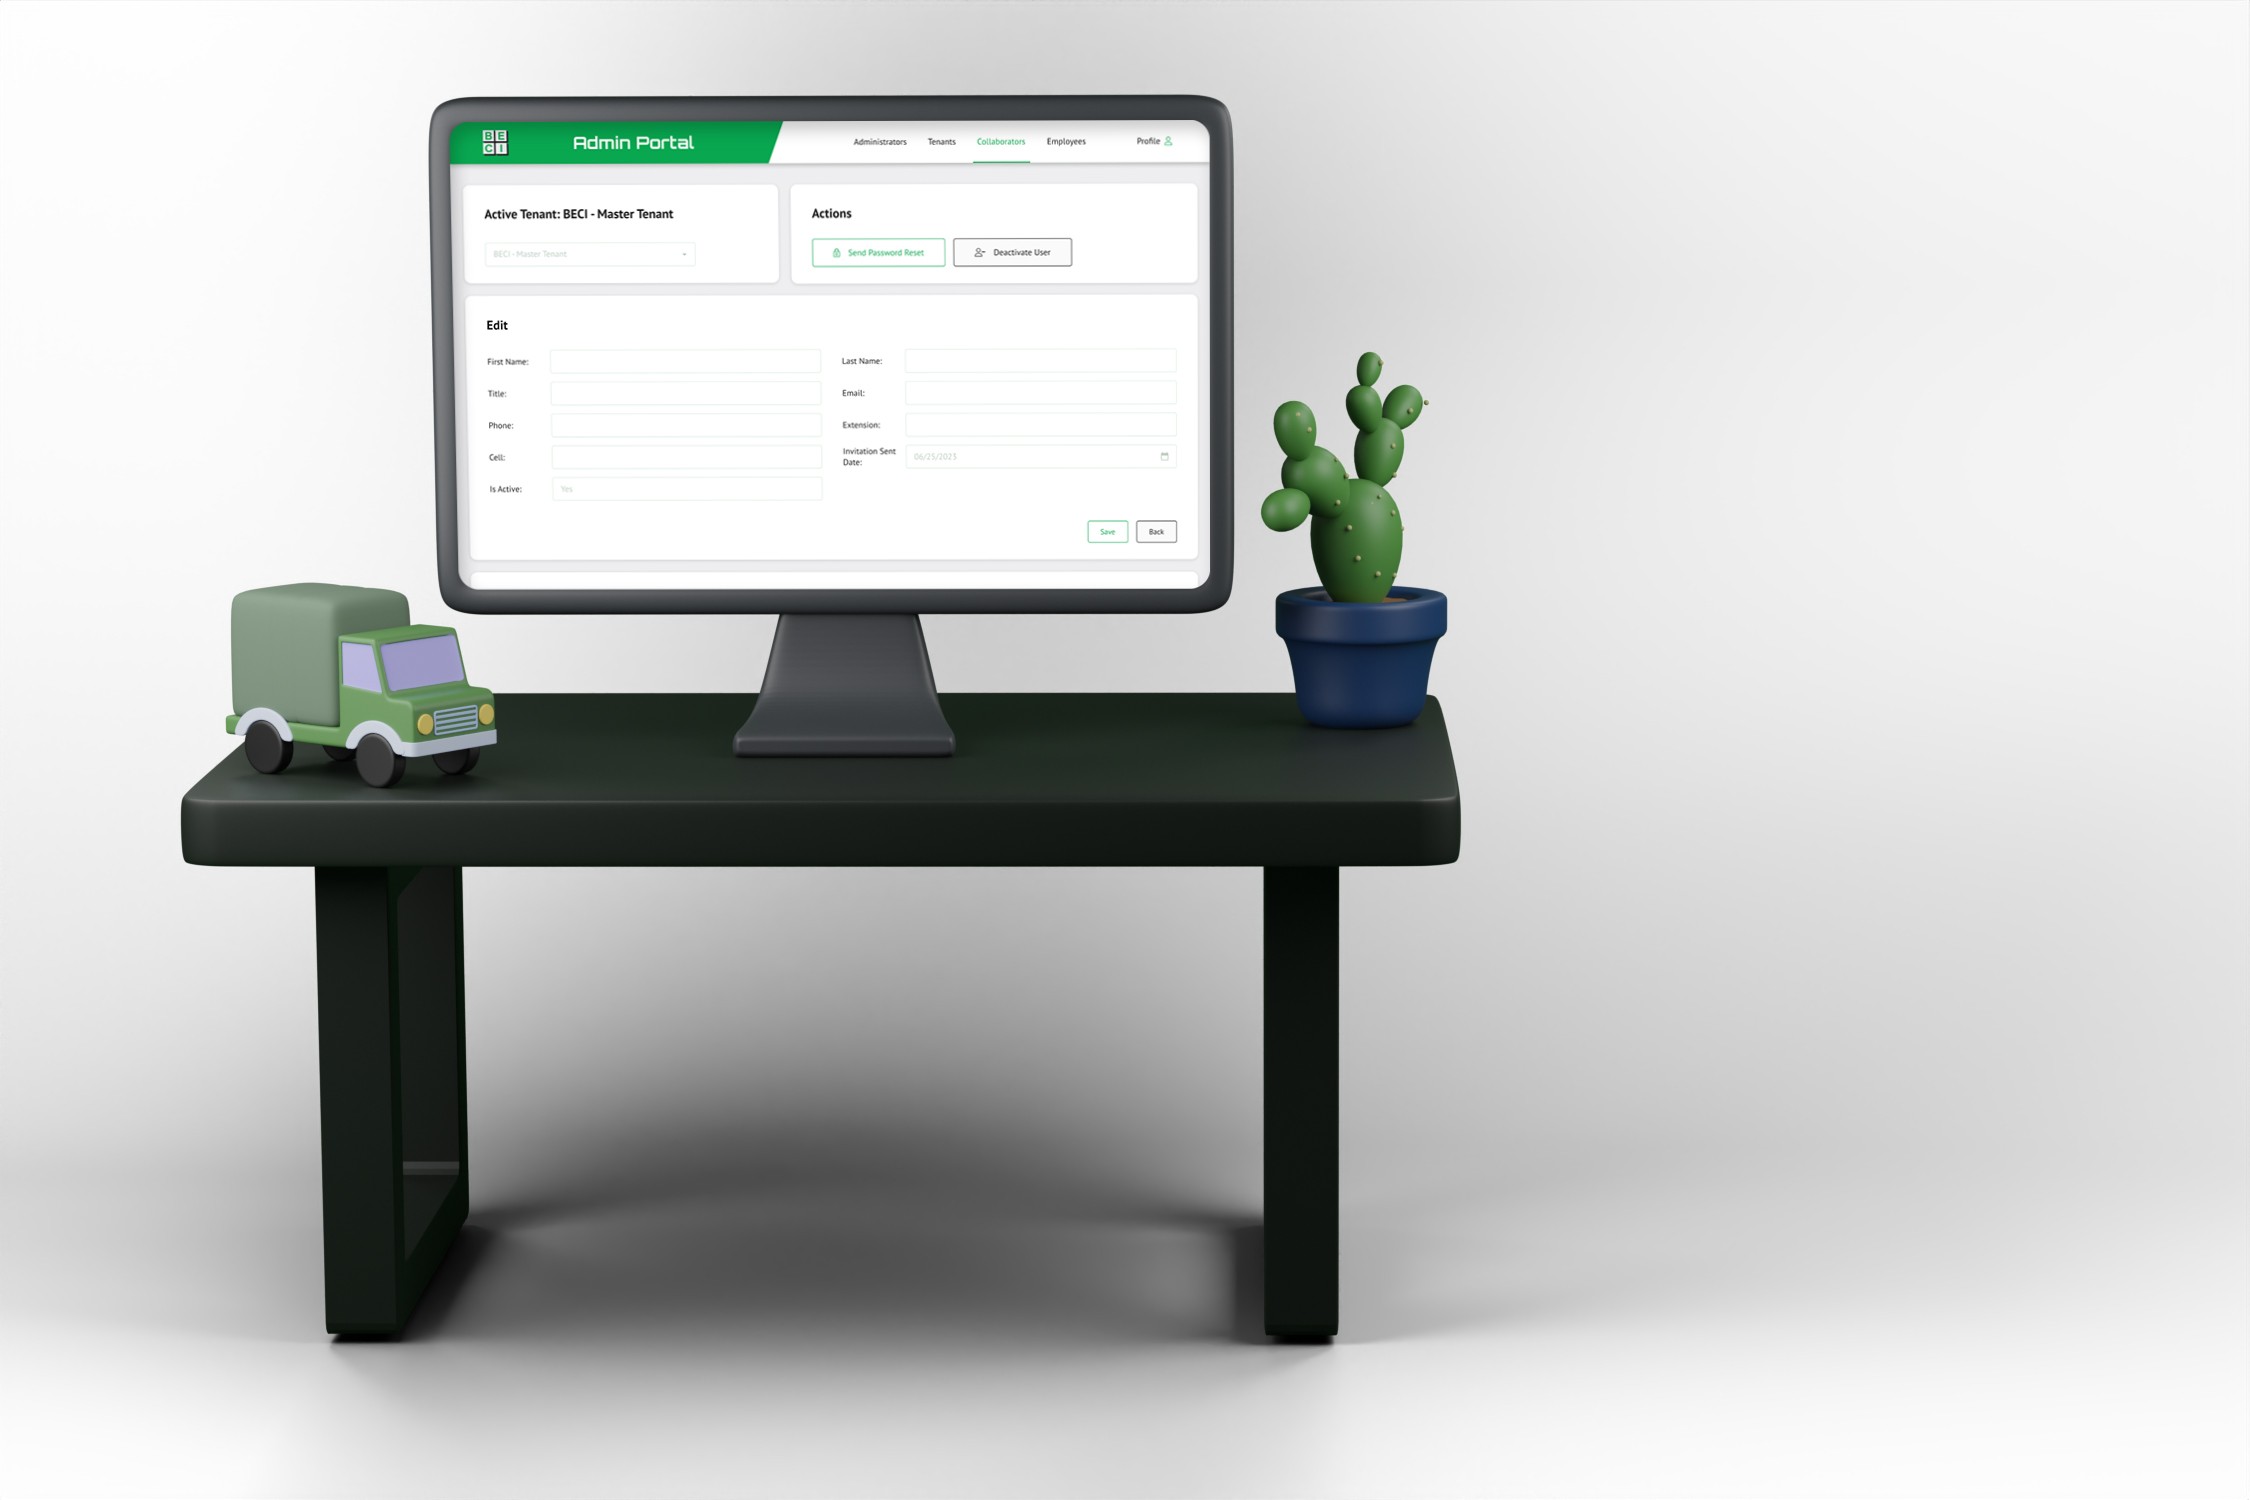
Adding a new user, but this time in hifi
By clicking the send invite button, an email will be sent to the user's email address so they can open NSPEC for the first time.


Conclusion
I handed the designs over to the development team and they were able to bring them to life. The BECI management team loved the way it looked and functioned so much that they wanted me to redesign the NSPEC tool using the same design language, and they wanted me to fix some UX issues as well. Overall, this project went very well. I enjoyed working closely with the BECI development team, and I'm glad the BECI management team loved the designs as much as they did.
Designing a client management tool that interfaces with an existing project management tool
2023
What was the problem?
BECI wanted to sell their in-house project management system, NSPEC, as a SaaS to other construction companies. They had the software to license, but they didn’t have any way to manage the people or companies that were going to use their service.
What was the solution?
I designed a tool that allows BECI to manage client profiles. Both company and user profiles can be added to the system, they can have their passwords reset by the administrator, and they can be activated or deactivated with the click of a button.
MY ROLE
Product Designer
THE TEAM
1 Product Designer
1 Product Owner
1 Project Manager
5 Developers
THE DELIVERABLES
Grayscale Wireframes
Hifi Prototypes
Screen Mocks
TOOLS USED
Figma
Google Suite
THE COMPANIES
Steele Consulting Inc: My employer where I worked as Product Design consultant.
BECI: BECI provides building envelope consulting services to over 2000 construction company clients, saving their clients millions of dollars. They are branching out into the SaaS market with NSPEC, their project management tool.
First wireframes
My first wireframes for this project were very basic. I worked closely with the developers at BECI, and my task was to make the process as simple as possible.
Each page, Tenants, Clients, and Employees, would have a simple grid. Users could be activated or deactivated, and each user’s information could be edited with an inline form. New users could be added by clicking the button at the top right of the grid.
At this point in the project, each page would have looked the same. The plan was for a lot of the functionality to be handled on the backend.
Adding a user, step one
To add a tenant, client, or employee, navigate to the correct page by clicking the item in the top navigation.
Adding a user, step two
Click the add user button at the top right of the grid to open an inline form. Fill in their information and click the save and invite button.
Adding a user, step three
By clicking the send invite button, an email will be sent to the user's email address so they can open NSPEC for the first time.
Second wireframes
For the second version of the wireframes, the development team told me that the managers wanted to see more of a flow. To accommodate this request, I removed the inline editing on the grids and made new pages for adding and editing information.
The Admin Dashboard
When a user logs in, they will see the admin dashboard. In order to change an NSPEC user’s permissions or edit their information, the admin still needs to navigate to the proper pages to do so.
There are a few additions to the dashboard in this second version. The first is the ability to change which tenant you’re viewing with the dropdown at the top left of the screen.
The second is the ability to add new clients and employees to the selected tenant from this screen. Clicking the invite buttons will take you through the adding a user flow and send them an invite to join NSPEC.
The third change is the addition of the admin grid. These admins are the people that will be using this system. They are the ones who invite new clients and employees to NSPEC. Admins cannot be added or edited from here, that can only be done on the backend, but BECI wanted the ability to change that in the future, so I added a button to add an admin, it’s just disabled for now.
New functionality for the tenants page
Similarly to the admins, the tenant’s information cannot be edited from the frontend. But like the admins, BECI wanted to be able to edit this information in the future, so I designed a page that will one day allow the information to be edited.
Also on the tenants page, users can invite new clients and employees to the selected tenant.
Inviting new users
Inline editing turned out to be confusing for the users, so I changed the flow a bit. Now, when adding a new user or editing an existing profile, all changes are made on a separate page, not within the grid itself.
Other than that, this process is largely the same as it was before. Sending an invite to a new profile will allow that person to access NSPEC.
Hifi designs
After getting approval from the BECI developers, I started working on a high fidelity prototype for the admin portal.
BECI’s style
Before I got started, the developers gave me this brand guide to follow while working on the UI.
However, I was given permission to stray from the brand guide a bit if I had a good reason. I opted to only use the Orbitron font for the large “Admin Portal” text in the top nav, and for the alert titles. I used PT Sans for the rest of the design mainly because Orbitron is a very wide font and it made the designs feel off balance in my opinion (also, I just don’t like Orbitron very much).
Thankfully, the stakeholders agreed with my font choice, and I was able to use PT Sans for most of the design.
Admin Dashboard
For the admin dashboard, only the UI was updated. The functionality remains the same.
The new collaborator page
During this phase of the design, the BECI team decided to change “clients” to “collaborators”. This decision was made because the word clients is used in NSPEC as the client of a collaborating company. So in my designs, the companies that use NSPEC are now collaborators, and their customers are now clients.
Collaborators and clients
While editing a collaborator’s page, I added a new section dedicated to the collaborator’s clients.
When a collaborator accesses NSPEC, they can create a list of their clients that they will track with NSPEC, and that list is added here for the admins to view.
Admins can add other clients from the NSPEC system to this list using the dropdown, and they can remove clients from the list as well.
Adding a new user, but this time in hifi
By clicking the send invite button, an email will be sent to the user's email address so they can open NSPEC for the first time.
Conclusion
I handed the designs over to the development team and they were able to bring them to life. The BECI management team loved the way it looked and functioned so much that they wanted me to redesign the NSPEC tool using the same design language, and they wanted me to fix some UX issues as well. Overall, this project went very well. I enjoyed working closely with the BECI development team, and I'm glad the BECI management team loved the designs as much as they did.

Work
About
Designing a client management tool that interfaces with an existing project management tool
2023
What was the problem?
BECI wanted to sell their in-house project management system, NSPEC, as a SaaS to other construction companies. They had the software to license, but they didn’t have any way to manage the people or companies that were going to use their service.
What was the solution?
I designed a tool that allows BECI to manage client profiles. Both company and user profiles can be added to the system, they can have their passwords reset by the administrator, and they can be activated or deactivated with the click of a button.
MY ROLE
Product Designer
THE TEAM
1 Product Designer
1 Product Owner
1 Project Manager
5 Developers
THE DELIVERABLES
Grayscale Wireframes
Hifi Prototypes
Screen Mocks
TOOLS USED
Figma
Google Suite
THE COMPANIES
Steele Consulting Inc: My employer where I worked as Product Design consultant.
BECI: BECI provides building envelope consulting services to over 2000 construction company clients, saving their clients millions of dollars. They are branching out into the SaaS market with NSPEC, their project management tool.
First wireframes
My first wireframes for this project were very basic. I worked closely with the developers at BECI, and my task was to make the process as simple as possible.
Each page, Tenants, Clients, and Employees, would have a simple grid. Users could be activated or deactivated, and each user’s information could be edited with an inline form. New users could be added by clicking the button at the top right of the grid.
At this point in the project, each page would have looked the same. The plan was for a lot of the functionality to be handled on the backend.
Adding a user, step one
To add a tenant, client, or employee, navigate to the correct page by clicking the item in the top navigation.
Adding a user, step two
Click the add user button at the top right of the grid to open an inline form. Fill in their information and click the save and invite button.
Adding a user, step three
By clicking the send invite button, an email will be sent to the user's email address so they can open NSPEC for the first time.
Second wireframes
For the second version of the wireframes, the development team told me that the managers wanted to see more of a flow. To accommodate this request, I removed the inline editing on the grids and made new pages for adding and editing information.
The Admin Dashboard
When a user logs in, they will see the admin dashboard. In order to change an NSPEC user’s permissions or edit their information, the admin still needs to navigate to the proper pages to do so.
There are a few additions to the dashboard in this second version. The first is the ability to change which tenant you’re viewing with the dropdown at the top left of the screen.
The second is the ability to add new clients and employees to the selected tenant from this screen. Clicking the invite buttons will take you through the adding a user flow and send them an invite to join NSPEC.
The third change is the addition of the admin grid. These admins are the people that will be using this system. They are the ones who invite new clients and employees to NSPEC. Admins cannot be added or edited from here, that can only be done on the backend, but BECI wanted the ability to change that in the future, so I added a button to add an admin, it’s just disabled for now.
New functionality for the tenants page
Similarly to the admins, the tenant’s information cannot be edited from the frontend. But like the admins, BECI wanted to be able to edit this information in the future, so I designed a page that will one day allow the information to be edited.
Also on the tenants page, users can invite new clients and employees to the selected tenant.
Inviting new users
Inline editing turned out to be confusing for the users, so I changed the flow a bit. Now, when adding a new user or editing an existing profile, all changes are made on a separate page, not within the grid itself.
Other than that, this process is largely the same as it was before. Sending an invite to a new profile will allow that person to access NSPEC.
Hifi designs
After getting approval from the BECI developers, I started working on a high fidelity prototype for the admin portal.
BECI’s style
Before I got started, the developers gave me this brand guide to follow while working on the UI.
However, I was given permission to stray from the brand guide a bit if I had a good reason. I opted to only use the Orbitron font for the large “Admin Portal” text in the top nav, and for the alert titles. I used PT Sans for the rest of the design mainly because Orbitron is a very wide font and it made the designs feel off balance in my opinion (also, I just don’t like Orbitron very much).
Thankfully, the stakeholders agreed with my font choice, and I was able to use PT Sans for most of the design.
Admin Dashboard
For the admin dashboard, only the UI was updated. The functionality remains the same.
The new collaborator page
During this phase of the design, the BECI team decided to change “clients” to “collaborators”. This decision was made because the word clients is used in NSPEC as the client of a collaborating company. So in my designs, the companies that use NSPEC are now collaborators, and their customers are now clients.
Collaborators and clients
While editing a collaborator’s page, I added a new section dedicated to the collaborator’s clients.
When a collaborator accesses NSPEC, they can create a list of their clients that they will track with NSPEC, and that list is added here for the admins to view.
Admins can add other clients from the NSPEC system to this list using the dropdown, and they can remove clients from the list as well.
Adding a new user, but this time in hifi
By clicking the send invite button, an email will be sent to the user's email address so they can open NSPEC for the first time.
Conclusion
I handed the designs over to the development team and they were able to bring them to life. The BECI management team loved the way it looked and functioned so much that they wanted me to redesign the NSPEC tool using the same design language, and they wanted me to fix some UX issues as well. Overall, this project went very well. I enjoyed working closely with the BECI development team, and I'm glad the BECI management team loved the designs as much as they did.
My other work

My other work
Want to say hi?
Send me an email or reach out on LinkedIn
colddahlman@gmail.com
© Connor Dahlman, 2024
Want to say hi?
Send me an email or reach out on LinkedIn
colddahlman@gmail.com
© Connor Dahlman, 2024